Downloading the POI to read xlsx...

What is Apache POI?
Apache POI is a popular API that allows programmers to create, modify, and display MS Office files using Java programs. It is an open source library developed and distributed by Apache Software Foundation to design or modify Microsoft Office files using Java program. It contains classes and methods to decode the user input data or a file into MS Office documents.

HSSF (Horrible Spreadsheet Format) : It is used to read and write xls format of MS-Excel files.
XSSF (XML Spreadsheet Format) : It is used for xlsx file format of MS-Excel.

Step 1- Download the apache poi jar file as below

Go to Official website of Apache POI  and Click on the download section

http://poi.apache.org/download.html


Now Click on the below mention link


All jar files will come in zip files, Extract it and you will get final jar folder looks like this. Add the highlighted jars to the build path.


Scheduling the Build in Jenkins!!!!


                      Scheduling the job in Jenkins!!!

Using Jenkins we can schedule jobs which we created

You can schedule buid for existing jobs which already created and while creating new project also we can specify the same.

 Lets schedule the job. Refer the below screenshot


Step 1-Click on configure then select the check box build periodically 


Step 2- Specify the time here we need to careful about the syntax 

Jenkins will accept 5 parameter lest discuss one by one * * * * *

Here first parameter- specify minute and range will vary from 0-59

 Here second parameter- specify hours and range will vary from 0-24

Here third parameter- specify day and range will vary from 0-7 here 0 and 7 will be sunday

Here fourth parameter- specify month and range will vary from 1-12

Here fifth parameter- specify year so here you can specify *

Example 1- if you specify 00 22 * * * it means your build will run daily @ 10 PM

Example 2- if you specify 50 * * * * it means your build will run daily 50 min after every hour

Example 3- if you specify 00 22 1 * * it means your build will run every monday @ 10 PM


Running Testng Programs from Jenkins!!!

                
Step 1- Lets create a windows batch which is required to invoke from Jenkins.

 To create batch file we need to set classpath of testng so that we can execute testng.xml files.

Our project structure should look like


Open command and set the classpath and execute the program from command line

 While setting classpath we will set the path of bin folder and libs folder (inside libs we have all libraries).

Setting the classpath as below:

C:\MyHome\ide-home\workspace-3.6\h2k\TestngProject> set classpath=C:\MyHome\ide-home\workspace-3.6\h2k\TestngProject\bin;C:\MyHome\ide-home\workspace-3.6\h2k\TestngProject\lib\testng-6.8.5.jar;C:\MyHome\ide-home\workspace-3.6\h2k\TestngProject\lib\jcommander-1.29.jar 


C:\MyHome\ide-home\workspace-3.6\h2k\TestngProject>java org.testng.TestNG testng.xml


Open notepad and type the below commands and save as .bat file –Copy the run.bat in the project directory. Contents of the run.bat as follows:

set classpath=C:\MyHome\ide-home\workspace-3.6\h2k\TestngProject\bin;C:\MyHome\ide-home\workspace-3.6\h2k\TestngProject\lib\testng-6.8.5.jar;C:\MyHome\ide-home\workspace-3.6\h2k\TestngProject\lib\jcommander-1.29.jar

java org.testng.TestNG testng.xml


Step 2- Now create a job in Jenkins which will execute our Testcases.

a. Open Jenkins on browser (type http://localhost:8080) 

Click on new item 


b. Specify the name of Job-Name, select Build a free-style software project and Click on OK button .


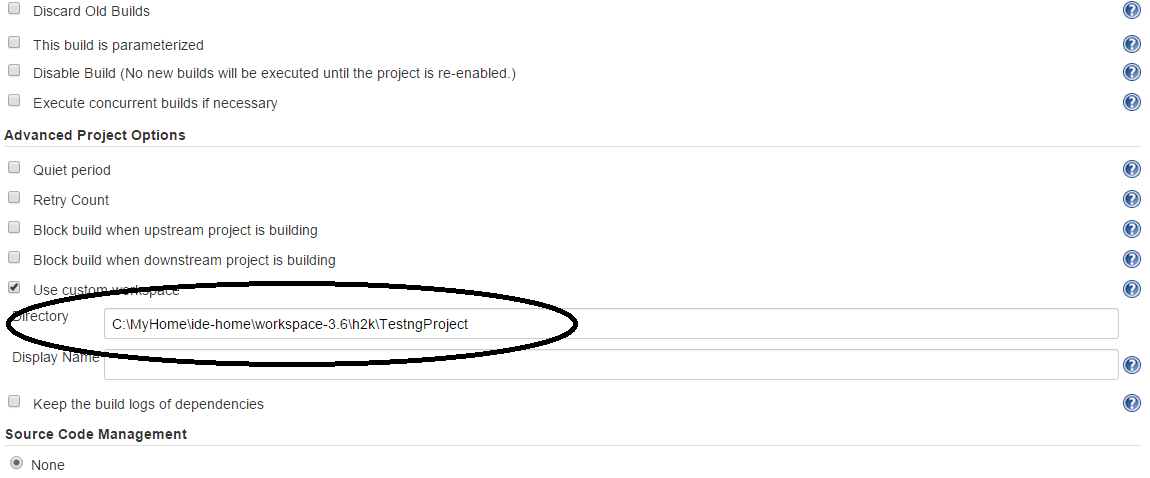
c. Navigate to Advanced Project Options > Check the use custom workspace > in directory  specify the project home directory.


d.  Now the final and most important part specify the Add Build step >Click on Execute Windows batch command.


 e. In the command section specify the batch file which we created and click on on Apply and save


Step 3- Now finally run the Build > Click on Build now.


Step 4- Check Build history and Console output and verify the output.


How to schedule buid in Jenkins